How To Level A Garden Pond
Pond Edging Ideas for liner ponds
Before you excavate your pond, it's worth thinking about the pond edging. The edging design will impact your excavation contours. Additionally, trenches may be required for footings.
As importantly for a great-looking pond, it must be level. Otherwise, all the hard work building your pond may result in parts of pond edging being too high with unattractive exposed liner.
How to build a level pond?
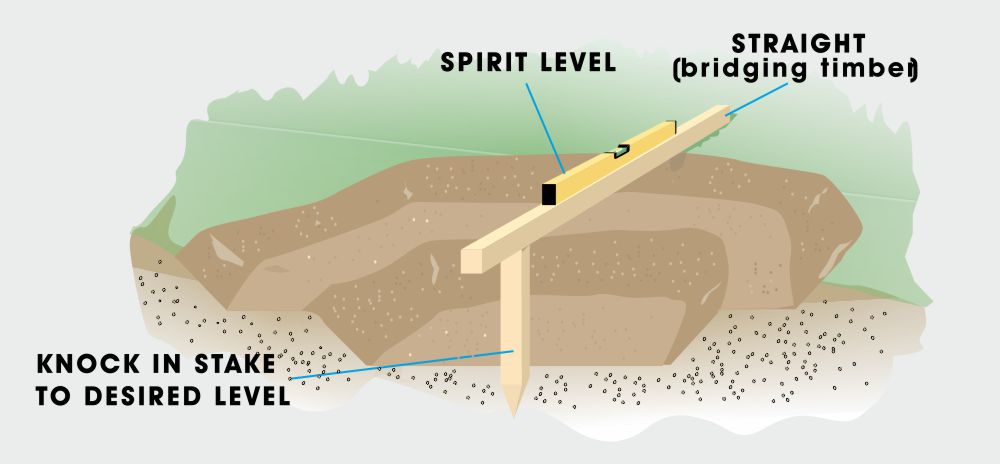
For a basic or wildlife pool edge, tap a stake securely into the centre of the excavation until the top is at the desired finished pool level.
Position a length of straight timber across from the stake to the side. Using a spirit level, work your way around the pond removing or building up the edge, creating a perfect level all the way around.
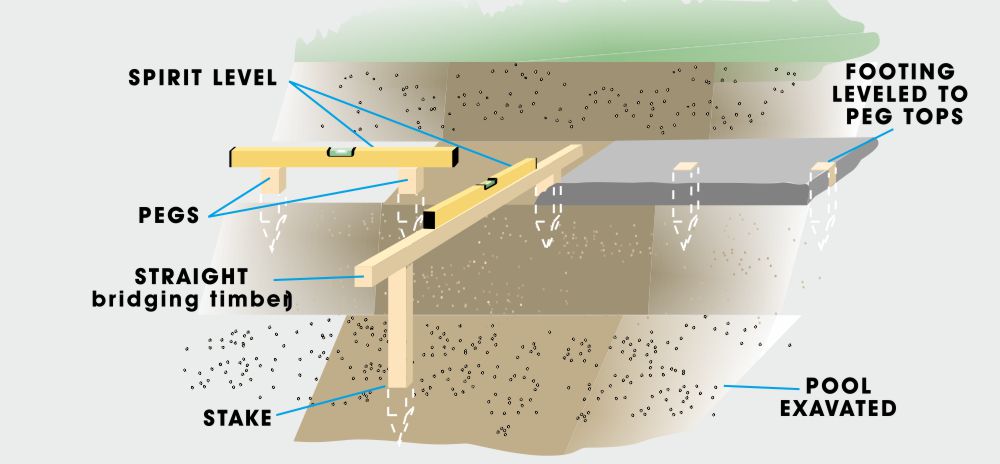
For more complex edging designs, you may need to construct a level concrete footing.
To achieve this, position a stake into the centre of the pond excavation as shown above. This time, the top of the stake should be at the finished level of the footing, which will be 10/15cms deep.
Using your straight timber and spirit level, tap some 30cm pegs to the same level around the edge every 50 to 100cms. (For ease, you can position one peg then use a spirit level off the top of that peg to continue around the pond. Be sure to double-check a few from the centre).
Once completed, ensuring all the pegs are at least 10-15cm proud of the soil, lay the footings to the top of the peg achieving a perfect level footing. (Note: If using more than one edging technique around the pond, levels may need to be varied accordingly)
What can I put around my pond?
Several excellent materials make a good edging for ponds, including pebbles, rockery, planting, paving stones, and even hardwood. TIP: Avoid sharp-edged gravel, rocks or treated timber.
Pond designs can be enhanced by a mix of edging techniques, maybe wooden decking at the front with natural planting areas and rock edging to the sides and back of the pond, with a waterfall tumbling in gently?

How can I finish the edge of my pond?
1.Simple stone pond edging
Very easy to do. However, your pond liner will be visible. The liner can be partly hidden by overlapping the edging stone a few cms over the pond's edge. Be sure your pond edge is level to avoid variations in the exposed liner.
2. Part submerged rock pond edging
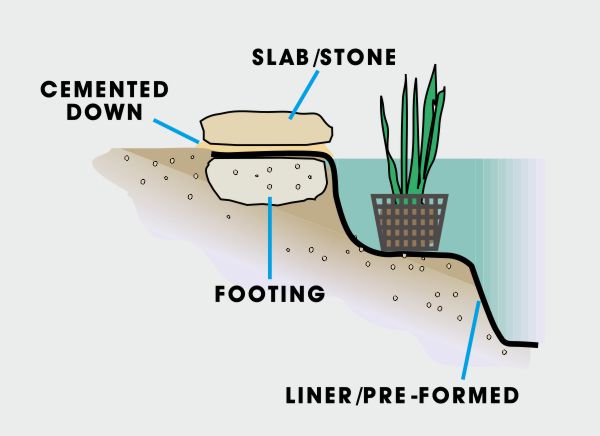
Another easy edging method. With the added benefit, your pond liner will not be visible. Rockery stone can be bedded on cement to secure. Additionally, underlay can be placed under the rocks to protect the pond liner from any sharp edges.
3. Paving Pond Edging
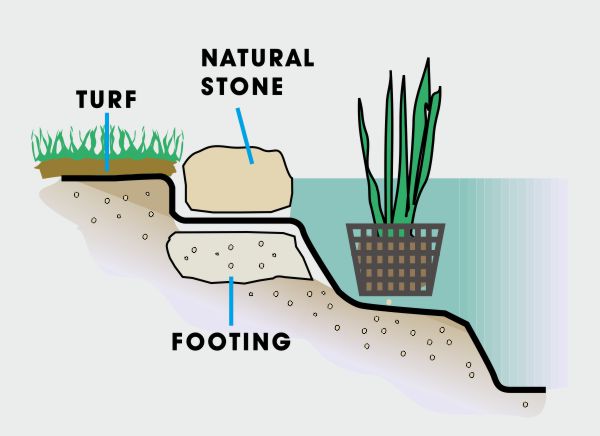
Looks great and hides the pond liner. A decent footing is needed for both the paving slabs and brick or stonework. Before laying any bricks or slabs, fill the pond up for a few days to allow the liner to settle in, plus leave a little slack to avoid the liner over-stretching due to settlement.
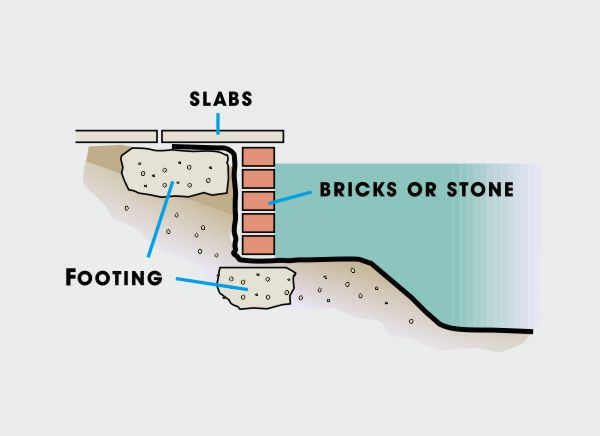
4. Raised Pond Edging
A neat way of building a raised pond whether all or part of the pond. On this example we have brought the liner into the cavity to look good and partly hide the liner . Remember before laying the top rocks or capping to fill the pond up for a few days to allow the liner to settle in, plus leave a little slack to avoid the liner over-stretching due to settlement.

5. Raised brick pond edging
Building a raised brick pond? For a neat finish to hide the liner, it is possible to bring it into the cavity for the last few courses.TIP: Use a quality rubber liner for flexibility, be careful that any fold does not fall lower than the water level.

6. Bog planting area pond edging
Design a wide shallow marginal planting shelf. Edge the pond side with rocks or hardwood logs. Line the planting area with some underlay to stop aquatic soil/gravel from spilling into the pond. Plant with marginal pond plants.
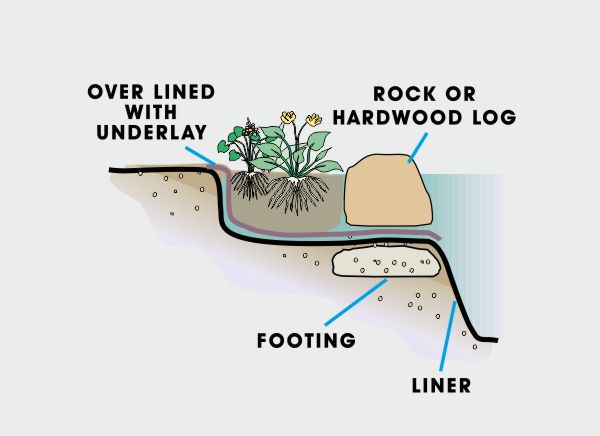
7. Wildlife pond edging beach area
Wildlife ponds like large shallow areas for amphibians and other natives to enter the pond or hide in the undergrowth. Shape this area during excavation, fill with a suitable aquatic substrate and plant as desired. Remember: Account for the extra liner requirements in your measurements.
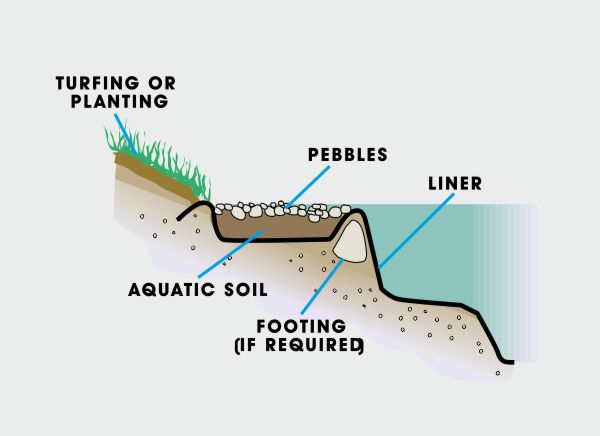
8. Pond planting edging
An easy cheap way to create a bog garden area, again using the pond excavation to shape. You will need to allow extra pond liner when using this method.
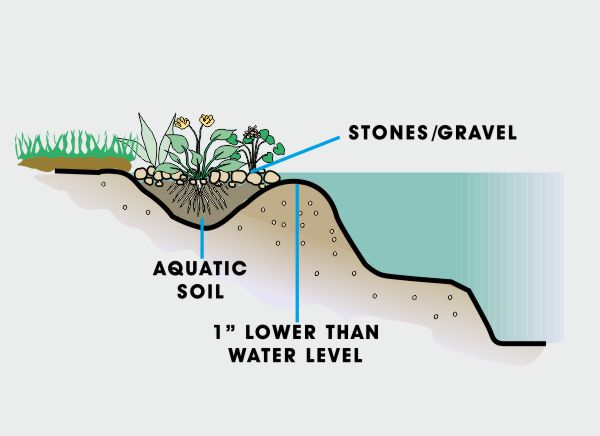
NOTE: The above examples with flexible liners do not show an underlay although use of one is highly recommended.
9. Wooden Decking Pond Edging
Enjoy looking directing into your pond from a deck extending over the edge of the pond.
A deck extending over a pond may need extra footings under the pond liner to take the weight of any supportive structure above the liner. Remember to put protective underlay on top of the liner before building any supports.
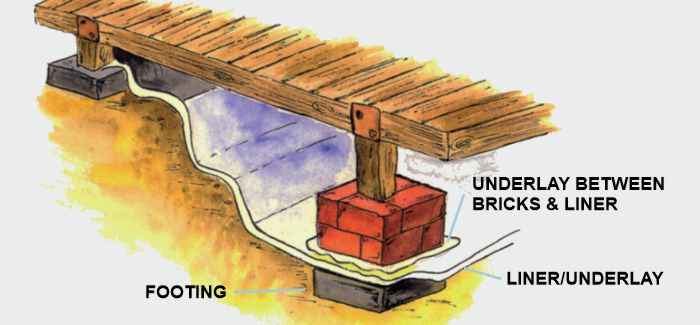
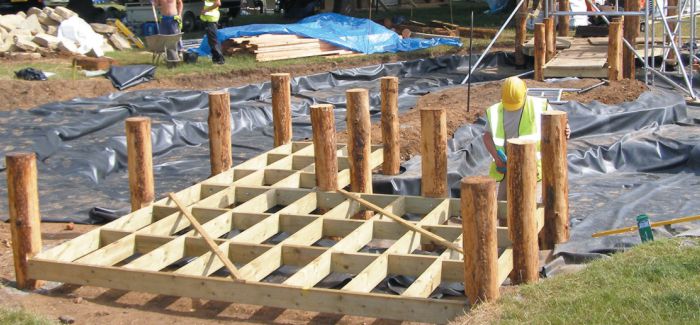
How to add support for pond decking, stepping stones and bridges
- Position another piece of underlay above the pond liner over the footing.
- Build up with brickwork. For stepping stones take the brickwork up to water surface level and then place your stepping stone on top.
- With a jetty you will only require enough bricks to brace the upright wooden leg.
- For fountain plinths, take the brickwork up to about 15cm below the water surface level and place a slab for the fountain to sit on. This will allow only the feature to be visible.

Pond Edging Tips
- Decide on the edging method before starting excavation.
- Footings are essential for most edging. Use ample concrete and a strong 3/1 sand cement mix.
- If liner comes in contact with the footings or walling, sandwich the liner with an underlay for protection.
- Any cement work which will come into contact with water should be treated to neutralise the lime. (Please ask in store for advice)
- Hide ducting for all cables and pipes into the edging, a couple of spare ducts could also be useful in the future.
- Any cement work, which falls into the pool during construction, must be removed.
- Always do a complete water change a few days after any cement work on a new pond before introducing any plant or fish life.
Levelling preformed shaped ponds
After excavation, cover the base of the hole with about 5cm of sand and level out, position the pond on the sand and place a spirit level across the top lips of the pond, reposition and add sand as necessary to achieve a level pond. Gradually fill the pond while back filling the sides. Do check manufacturer's instructions for specific installation information.
Related Topics
How To Level A Garden Pond
Source: https://worldofwater.com/how-to-build-a-level-pond-and-edging/
Posted by: colemancion1967.blogspot.com

0 Response to "How To Level A Garden Pond"
Post a Comment